.png)
Something I love to do is crochet using graphs. I feel it's a great way to express yourself and your love for art. Making your child's favorite character into a blanket or recreating a photo from your and your husband's first date, it's so satisfying seeing your finished project hanging or lying around. My favorite thing to make is hanging decor using double-crochet c2c. Simple, it works up quickly, and the result is beautiful!
Since I've been blessed enough to stay home and school my children myself, I've found more time to do the things I love. I have so many small projects going I'm not sure what to do with them when they're finished! I've been working on writing patterns and making gifts, and that means LOTS of yarn all over the house. I'm planning on creating blankets for several people for next Christmas, so I'm hoping I won't get bored with them halfway through the year. Having these small projects will definitely help with that!


The other day I decided I wanted to make a c2c hanging cross decor to go with the other on I made several years ago. I also wanted to share the graph and some information for anyone else who wants to make it.
I'm not great at explaining how to crochet corner-to-corner, so I have a video posted to help show what I do to create a double-crochet corner-to-corner wall-hanging.
Some notes:
• Weaving in ends isn't so bad. I'm not a huge fan of carrying yarn colors that contrast each other, especially in small projects, so I have a lot of ends to weave in. It doesn't bother me, though, because that's something I can do while the baby naps and I have to have quiet work.
• The wood I used to hang the decor is from a hibernating Hydrangea bush. It's a sturdy stem, but I would also suggest using Rhododendron or Mountain Laurel branches. We don't have those on our property at the time, though, so I found the next best thing.
• The wrapping at the top of my cross hanging isn't perfect, but since it's for my house it doesn't have to be perfect. Imperfection in handmade items is supposed to be special, anyway.
• When tying the yarn to hang, I use a slipknot and weave the end into the decor. If you want to make it shorter, all you have to do is wrap each side around the branch a few times.
• For a c2c project, make sure you pay attention to which side you are increasing and which one you're decreasing. In a rectangle, you start decreasing one side several rows before you start decreasing the other side.
•Corner-to-corner crochet is usually just a couple of stitches worked over and over, back and forth, to form a shape, large or small. I choose double-crochet gor graphs because I fele like it works best.
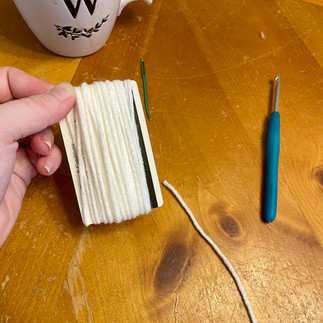
•For the fringe, I used the long side of a gift card. Wrap it 30-40 times, fold each strand in half and use a crochet hook to bring a loop where you want the fringe. Place the tails through the loop and tighten.
•To weave in the ends, just use your tapestry needle to zig-zag your tails through the project to ensure they will not wiggle their way loose. You don't have to do it as many times as you would for an item that isn't just going to be hanging.
•When the rectangle is finished and the ends are taken care of, use the tapestry needle to sew the project around your branch/stick/dowel rod, whatever you've chosen.
The materials I used for this project:
•4mm crochet hook (I like this set: https://a.co/d/coiH37o)
•Crafter's Secret yarn, in white
•Red Heart yarn in dark blue
•scissors (I LOVE these scissors: https://a.co/d/bZhgln9)
•tapestry needle (these are my favorite: https://a.co/d/7llipiP)
•Hydrangea branch
•measuring tape
•The chart I created, which you can download below: (I used stitchfiddle.com, which is an amazing tool for creators!)


I hope this video helps!
Thank you so much for visiting my blog! I hope I helped you out at least a little bit. Keep an eye on my blog, I'll be posting more freebies and such soon!
Comentários